The second option is to download the video from YouTube and then insert it as a movie file into PowerPoint. This is harder process because you’re going to have to find a website or tool to download the videos, which is not something YouTube officials supports, except for downloading your own videos. Then you’ll have to convert the files to AVI or WMV because PowerPoint doesn’t support the default format that YouTube videos are encoded in. In this article, I’ll walk you through the steps to get your YouTube video into PowerPoint using both of these methods, however, you’ll have to Google around and find a way to download the YouTube video yourself.
Method 1 – Use Embed Code
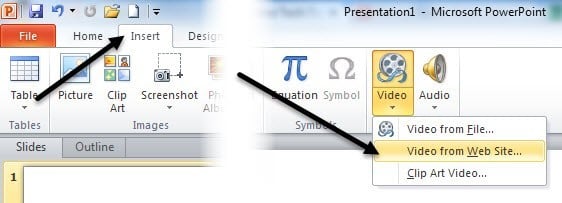
If you’re using PowerPoint 2010 or higher, then there is a really nice option now that lets you insert videos from video-sharing websites like YouTube. Open PowerPoint and then click on Insert on the ribbon.
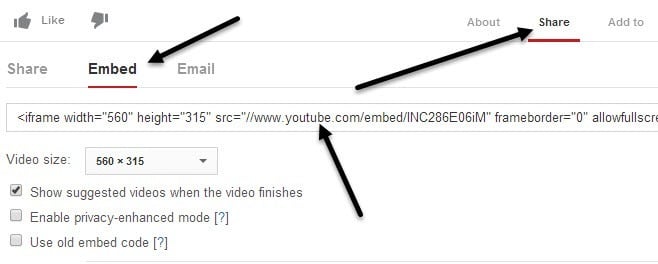
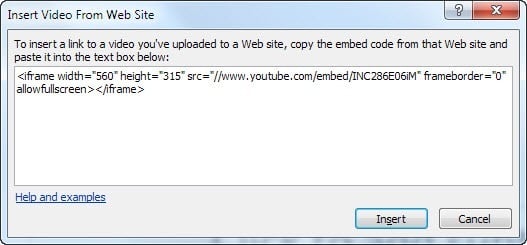
You’ll see a Video button and if you click on that, you’ll see the option for Video from Web Site. A box will pop up that asks you to paste in the embed code. Now you have to go get the embed code from YouTube. To do that, go to the video and then click on Share and then Embed.
Copy the code from the box that starts with <iframe width and then paste that into the box in PowerPoint.
Click Insert and your video should now be in the PowerPoint slide. You can move it around and even resize it just like any other PowerPoint object. When you play your slideshow, the video will start to play when the slide comes up.
Note that in order versions of PowerPoint, you will have to follow method 2, which means you’ll have to download the video, convert it and then insert it into PowerPoint. The second method is also for anyone who wants to include a YouTube video, but doesn’t have an Internet connection when the slideshow plays. With no Internet, the video won’t stream.
Method 2 – Download and Convert
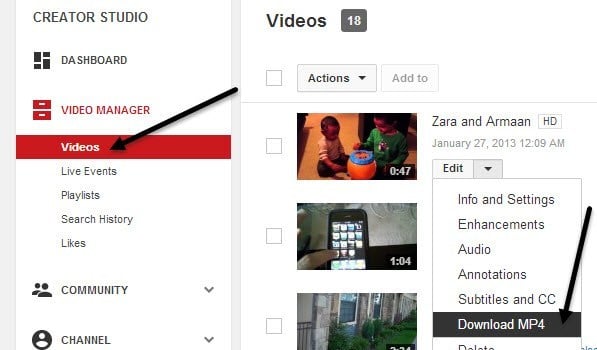
As I mentioned above, downloading your own YouTube videos is very easy. Log into your YouTube account and click on your picture up at the top right. Then click on Creator Studio.
Now click on Video Manager in the left menu and you’ll see a list of all your videos. Click on the little down arrow next to Edit and click on Download MP4.
When you go back to PowerPoint, this time you click on Insert, Video and then Video from File. Find your downloaded movie and it will be inserted into the presentation. Again, inserting the video this way will ensure you can play the video even if you don’t have an Internet connection. If you want to download a YouTube that’s not your own, you’ll have to search Google for that first. Once you have downloaded the video, you can check out any of these two free sites for converting the Flash video to MP4, AVI or WMV. http://www.online-convert.com/ http://convert-video-online.com/ Depending on the version of PowerPoint, the video formats supported may differ so here’s a breakdown for each version: PowerPoint 2013 – AVI, MP4, M4V, MOV, MPG, MPEG, SWF, or WMV. Nothing has to be installed to insert these formats. PowerPoint 2010 – SWF, AVI, MPG, MPEG, WMV. If Apple QuickTime is installed on the computer playing the presentation, then it can also support MP4 and MOV file formats. PowerPoint 2007 – AVI, MPG, MPEG, WMV Go ahead and convert your video to the appropriate format for your version of Office and then insert it using the method I showed above. That’s about it! If you have any trouble inserting videos into your PowerPoint presentation, post a comment and we’ll try to help. Enjoy!
